Getting Started
Hint
The fastest way to get started with Reactor may be to watch some of the introductory YouTube videos I've created, which will walk you through real world examples and show you to build automations.
Concepts and Terminology
Reactor responds to changes in device and system states. When something Reactor is interested in (which you define) changes, Reactor evaluates user-defined conditions to see if a specific set of conditions matches or not. If the conditions are met, Reactor will run an activity, which contains actions that can manipulate devices or change system states.
The conditions are contained in a ReactorSensor, a child device of the main Reactor device that is used as an organizational container for conditions and activities. You may create as many or as few of these ReactorSensors as you need — they are light on system resources, there is no limit other than practical, and there is no fee or limit enforced when you reach a certain number of ReactorSensors.
Free, as in free beer
Did I mention that Reactor is free? That's right. No charge. For any amount of logic you want to build. Support through the Vera Community Forums is also included. I will never charge for Reactor (but donations are appreciated to support this and other projects).
Conditions are organized into condition groups (or simply groups). A group of conditions has a logic operator associated with it. A group with two conditions that uses the "AND" logic operator will only be true when both conditions are true (A AND B). A group that uses the "OR" operator will be true when any of the conditions is true, but false when none of them is true (A OR B). And so on. Reactor supports the boolean operators AND, OR, and XOR (exclusive-or), and the inversion operator NOT.
Originally, Reactor's purpose was simply to provide better triggering for Vera scenes, and it did that by creating virtual binary sensors. A Vera scene can be easily triggered by the true and false states of a binary sensor, so it made sense to users new and experienced. This is why these logic containers are called ReactorSensors, and to this day, ReactorSensors are still binary sensors, although there are now better ways to use them.
Now, ReactorSensors have their own "scenes", multiple scenes, in fact, which are called activities. Activities are more powerful than scenes in the following ways:
- For any group of logic conditions in the ReactorSensor, you automatically get two activities: one that can be run when the group result changes to true, and one that can be run when the group result goes false. These are held together with the groups, so you don't have a proliferation of Vera scenes.
- Activities are tracked and managed by Reactor, so reloads or power failures that occur while an activity is running do not abandon the unfinished work of the activity: the actions resume when the Vera is back up and running.
- Activities offer more options to control things in the system without resorting to Lua coding or installing additional plugins.
- Activities can be edited without requiring a Luup reload, which not only makes you automation development faster, but reduces downtime in live controllers (because Murphy will ensure that your wife is coming up the dark basement stairs at the moment you just saved a scene change, so Vera is reloading and the motion sensor's call to turn on the lights therefore goes unnoticed — except by her).
So to recap, a ReactorSensor is a container for an arbitrary number of logic groups, and activities that can be run in response to the changing result of those logic groups. The groups themselves can contain an arbitrary number of conditions, which are rules you define to test device and system states.
Here's an extremely basic Reactor project to get you familiar with a few of the core functions and interface elements you'll need to know. This isn't meant to be an exhaustive tutorial, just an introduction.
New to Vera?
If you are a new Vera user, it's important that you understand some basic concepts about how Vera devices operation. Please read the Luup State Variables Tutorial before continuing. This will explain how device states are stored in Vera, which is key to your success with Reactor and a variety of other tools and plugins on the system.
Making Your First ReactorSensor
When you first install Reactor, the only device you have is the master Reactor device, also referred to as the plugin device. This device is the ringmaster for an arbitrary number of ReactorSensors (abbreviated to RS), which are child devices you must first create. To create a ReactorSensor, go into the control panel of the Reactor master device and click the "Add Sensor" button. Creating a "child" device on Vera causes a Luup reload, which will happen immediately, and your system will be busy for a few seconds. While that's going on, refresh your browser (CTRL-F5 for Chrome/Win, SHIFT-F5 for Firefox/Win, CMD+SHIFT+R for most Mac browsers). Don't skip this last step — it's very important.
Why is it called a ReactorSensor?
When Reactor was first written, it was written to just be a more capable triggering mechanism for Vera scenes than the built-in device triggers. Since any scene can be triggered by the tripping of security sensor (like a motion or door sensor), I made the decision to use that device type for Reactor's active logic elements. However, many find Luup's scenes cumbersome to configure and manage, especially when you accumulate a lot of them. Since that early version, Reactor has now grown to address those shortcomings by including its own Activities, obviating the need to use Vera scenes. But the sensor behavior remains today as a legacy behavior of the plugin, and will likely never be removed.
Status Tab — The Dashboard of Your ReactorSensor
After creating your new ReactorSensor, go into its device control panel. You will find yourself on the "Status" tab. Since this is a brand new ReactorSensor, it's not going to show you much of any interest, but you should see the default condition, which is just a comment welcoming you.
When you add conditions to your ReactorSensor, which we'll get into shortly, they will appear here along with their condition status. So this is a central view of your ReactorSensor's activities that you will find useful for verifying and debugging the operation of your logic conditions.
Conditions — Deciding When Action Needs to be Taken
The core thing you will have to do with all ReactorSensors is set up conditions, which are the tests that it performs. This is done in the "Conditions" tab of a ReactorSensor. Go into the ReactorSensor you created above, and you'll see the tab there — click it. You'll see that you're in editing mode for a comment condition, which is the minimal default that a new RS starts with. You can change that, so choose "Service" from the menu that currently says "Comment". The "Service" condition is the test that looks at device states. You'll then see a menu that lists all of your devices. Choose a switch (preferably one conveniently near your computer, but it doesn't matter which/what it controls). Then choose the "Status" variable from the next menu (if there are multiple Status entries, choose the one that says "(SwitchPower1)" after it).
The last thing we want to do with our first switch condition is decide about the state of the switch, so to make life interesting, let's just say we want to know when the switch is off (just to be different). Next to the menu now showing the selected "Status" variable, you'll see a menu of operations... choose "is FALSE" (you could also choose the "equals" operator and enter "0" as the operand in this case). That completes the editing for now, so click the "Save" button.
Now go back to your Status tab. You should see now that your ReactorSensor is showing your switch condition. If your switch is currently off, the condition will be highlighted with bold green text, indicating that the condition has been met. If you walk over to that switch and turn it on, you should shortly see that the condition display goes to black. Since we set up the test with an "is FALSE", the condition is met (true) whenever the switch is off, and not met when the switch is on (i.e. the condition state is the reverse of the switch state).
Instant Status -- A Legacy Z-Wave Conundrum
Instantaneous response to a manual press/change of a switch requires that the device implement some form of "instant status." Not all devices do. If your RS status doesn't change immediately when you're manipulating your switch by hand, try changing the switch state via the Vera UI. If the RS condition then updates immediately, your switch doesn't support instant status.
Activities — Turning Decisions into Actions
Now you want to do something with that information, so head over to the "Activities" tab in your RS. This looks a bit like the Conditions tab/editor, but this is where you specify actions that your RS needs to perform. You'll see two empty activity groups:
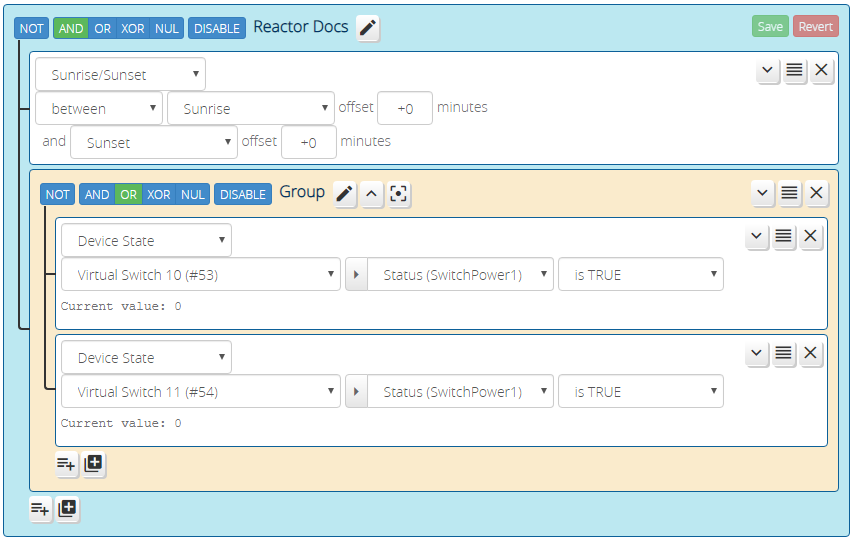
Something we ignored above is that you were configuring that condition in a group. A group is simply a collection of conditions. In the simplest case, you will have one group, as you do in this example, which is called the "root" group. The root group is the mother of all groups. You can create additional groups, and they will all live within the root group. This is the way you can mix and match conditions with operators other than "AND". For example, if you want to do something when it's between sunrise and sunset and either of two switches is on, that put in slightly different language is: between sunrise and sunset and ( switch one is on or switch two is on ). Those parentheses tell you to make a subgroup: you would have a Sunrise/Sunset condition in the root group set for AND, then add to that a new group, set for OR and containing your two Device State conditions to check your switches:
Before you venture into deeper learning, the last thing you need to know is that Reactor only runs activities once per state change. To illustrate what this means, let's say you have an RS with just one condition that looks at a temperature sensor and tests to see if the current temperature is greater than or equal to 25°C. When the temperature sensor reports 24°C, the condition is not met, so it is false, and since it's the only condition in the only group, the RS will be untripped. When the temperature climbs to 25°C, the condition is then met, so the group becomes true and the RS becomes tripped, so the tripped activities are then run. Then a short time later, the temperature climbs and the sensor reports 26°C. At this point, the condition was already met at 25°C — it's true and it can't get more true (true/false is binary — it is or it isn't — unlike politics, there are no degrees of true and false, no grey areas between). So, since the condition is already true, and the group true, and thus the RS is already in tripped state, the tripped activities are not run again. Activities only run when state changes.